안녕하세요. 보랏입니다.
3일동안의 연휴가 끝나고 이제 다시 수업을 시작하였습니다.
오늘은 추론통계와
생체인식 라이브러리인 cv2, mediapipe에 대해서 배웠습니다.
바로 복습시작하겠습니다.
1. 추론 통계
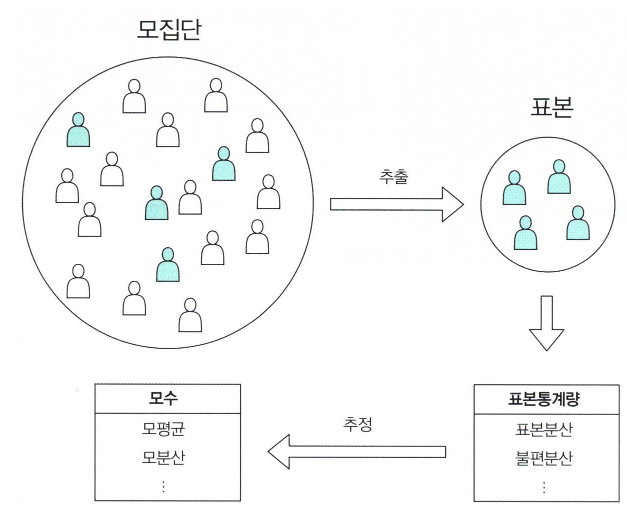
모집단과 표본
- 추측통계에서는 관측 대상 전체의 통계적 성질을 그 관측 대상의 일부분만 사용하여 추측
- 추측하고 싶은 관측 대상 전체를 모집단(population)
- 추측에 사용하는 관측 대상의 일부분을 표본(sample)
- 모집단에서 표본을 골라내는 일을 표본추출(sampling)
- 골라낸 표본의 수를 표본 크기 또는 샘플 사이즈
- 표본을 바탕으로 계산한 평균이나 분산, 상관계수 등을 표본통계량
- 모집단의 평균이나 분산, 상관계수 등을 모수
- 표본을 대상으로 표본평균이라는 표본통계량을 사용해서 학교 전체의 평균 점수인 모평균을 추측
- 표본평균으로 모평균을 추측할 때, 표본평균은 모평균의 추정량(estimator)
- 실제로 표본의 데이터를 이용하여 계산한 결과를 추정값(estimate)
표본추출방법
import numpy as np
import pandas as pd
import matplotlib.pyplot as plt

%precision 3
%matplotlib inline

np.random.choice([1, 2, 3], 3) --> array([3, 1, 1])- 임의로 표본을 추출하는 방법을 무작위추출(random sampling)
- 여러 차례 동일한 표본을 선택하는 추출 방법을 복원추출(sampling with replacement)
- 동일한 표본은 한 번만 선택하는 방법을 비복원추출(sampling without replcement)
확률 모델
- 불확정성을 수반한 현상을 해석하기 위해 확률(probability)
- 확률을 사용한 무작위추출 혹은 주사위를 모델링 한 것을 확률 모형(probability model)
확률 분포
- 결과를 알아맞힐 수는 없지만, 취하는 값과 그 값이 나올 확률이 결정되어 있는 것을 확률변수(random variable)
- 주사위를 굴릴 때까지 어떤 눈이 나올지 알 수 없지만, 주사위를 굴리면 눈은 하나씩 결정
- 이와 같이 확률변수의 결과를 관측하는 것을 시행(trial)이라고 하고, 시행에 의해 관측되는 값을 실현값(realization)
- 눈이 1이나 눈이 홀수 처럼 시행 결과로 나타날 수 있는 일을 사건(event)
- 눈이 1처럼 더 세부적으로 분해할 수 없는 사건을 근원사건(elementary event)
num_trial = 100
sample = np.random.choice(dice, num_trial, p=prob)
sample

np.histogram(sample, bins=6, range=(1, 7))

freq, _ = np.histogram(sample, bins=6, range=(1, 7))
pd.DataFrame({'frequency':freq,
              'relative frequency':freq / num_trial},
              index = pd.Index(np.arange(1, 7), name='dice'))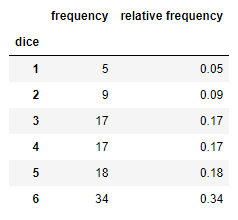
fig = plt.figure(figsize=(10, 6))
ax = fig.add_subplot(111)
ax.hist(sample, bins=6, range=(1, 7), density=True, rwidth=0.8)
# 실제의 확률분포를 가로선으로 표시
ax.hlines(prob, np.arange(1, 7), np.arange(2, 8), colors='gray')
# 막대 그래프의 [1.5, 2.5, ..., 6.5]에 눈금을 표시
ax.set_xticks(np.linspace(1.5, 6.5, 6))
# 주사위 눈의 값은 [1, 2, 3, 4, 5, 6]
ax.set_xticklabels(np.arange(1, 7))
ax.set_xlabel('dice')
ax.set_ylabel('relative frequency')
plt.show()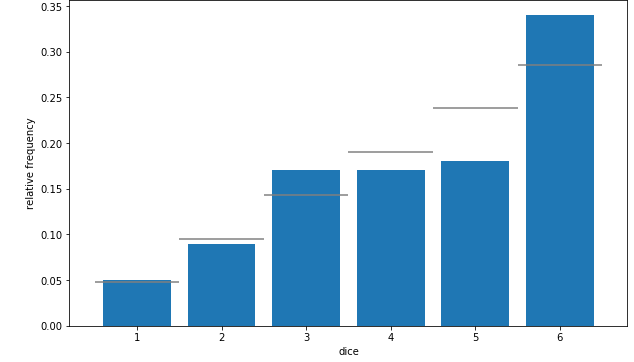
2. cv2, mediapipe
mediapipe
- 구글에서 주로 인체를 대상으로하는 비전인식기능들을 AI모델 개발과 기계학습까지 마친 상태로 제공하는 서비스
cv2
- 실시간 컴퓨터 비전을 목적으로 한 프로그래밍 라이브러리로 실시간 이미지 프로세싱에 중점
- 카메라, 에지 기반 또는 클라우드 기반 컴퓨팅, 소프트웨어 및 인공지능을 결합하여 시스템이 사물을 확인하고 식별할 수 있게함
얼굴 구조 인식
pip install opencv-python
pip install mediapipe

import cv2
import mediapipe as mp
import matplotlib.pyplot as plt
import numpy as np

IMAGE_FILES = []
BG_COLOR = (192, 192, 192) # gray
cap = cv2.VideoCapture(0)
with mp_holistic.Holistic(
    min_detection_confidence=0.5,
    min_tracking_confidence=0.5) as holistic:
  while cap.isOpened():
    success, image = cap.read()
    if not success:
      print("Ignoring empty camera frame.")
      # If loading a video, use 'break' instead of 'continue'.
      continue


    # To improve performance, optionally mark the image as not writeable to
    # pass by reference.
    image.flags.writeable = False
    image = cv2.cvtColor(image, cv2.COLOR_BGR2RGB)
    results = holistic.process(image)


    # Draw landmark annotation on the image.
    image.flags.writeable = True
    image = cv2.cvtColor(image, cv2.COLOR_RGB2BGR)
    mp_drawing.draw_landmarks(
        image,
        results.face_landmarks,
        mp_holistic.FACEMESH_CONTOURS,
        landmark_drawing_spec=None,
        connection_drawing_spec=mp_drawing_styles
        .get_default_face_mesh_contours_style())
    mp_drawing.draw_landmarks(
        image,
        results.pose_landmarks,
        mp_holistic.POSE_CONNECTIONS,
        landmark_drawing_spec=mp_drawing_styles
        .get_default_pose_landmarks_style())
    # Flip the image horizontally for a selfie-view display.
    cv2.imshow('MediaPipe Holistic', cv2.flip(image, 1))
    if cv2.waitKey(5) & 0xFF == 27:
      break
cap.release()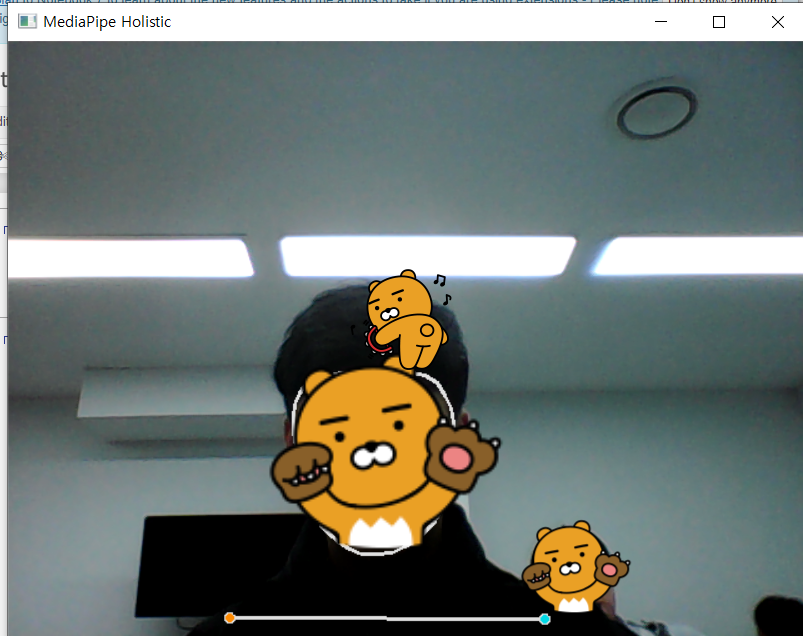
얼굴 인식하기
mp_face_detection = mp.solutions.face_detection
mp_drawing = mp.solutions.drawing_utils
def plt_imshow(title='image', img=None, figsize=(8 ,5)):
    plt.figure(figsize=figsize)

    if type(img) == list:
        if type(title) == list:
            titles = title
        else:
            titles = []

            for i in range(len(img)):
                titles.append(title)

        for i in range(len(img)):
            if len(img[i].shape) <= 2:
                rgbImg = cv2.cvtColor(img[i], cv2.COLOR_GRAY2RGB)
            else:
                rgbImg = cv2.cvtColor(img[i], cv2.COLOR_BGR2RGB)

            plt.subplot(1, len(img), i + 1), plt.imshow(rgbImg)
            plt.title(titles[i])
            plt.xticks([]), plt.yticks([])

        plt.show()
    else:
        if len(img.shape) < 3:
            rgbImg = cv2.cvtColor(img, cv2.COLOR_GRAY2RGB)
        else:
            rgbImg = cv2.cvtColor(img, cv2.COLOR_BGR2RGB)

        plt.imshow(rgbImg)
        plt.title(title)
        plt.xticks([]), plt.yticks([])
        plt.show()

-----------------------------------------------------------------------------------------------

image_path = './1570150763720629.jpg'
image = cv2.imread(image_path)
with mp_face_detection.FaceDetection(model_selection=1, min_detection_confidence=0.5) as face_detection:
    results = face_detection.process(cv2.cvtColor(image, cv2.COLOR_BGR2RGB))

    # Draw face detections of each face.
    if not results.detections:
        print("Face not found in image")
    else:
        print('Found {} faces.'.format(len(results.detections)))

        annotated_image = image.copy()

        for detection in results.detections:
            # print(mp_face_detection.get_key_point(detection, mp_face_detection.FaceKeyPoint.NOSE_TIP))
            mp_drawing.draw_detection(annotated_image, detection, bbox_drawing_spec=mp_drawing.DrawingSpec(color=(0, 255, 0), thickness=7))

        plt_imshow(["Original", "Find Faces"], [image, annotated_image], figsize=(16,10))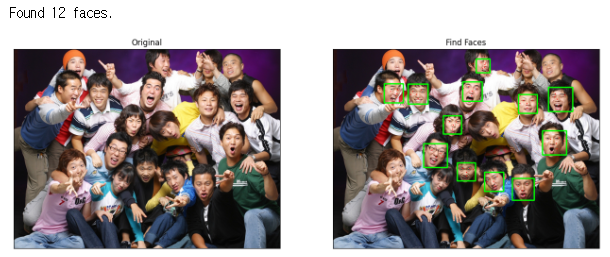
이렇게 복습 마무리 하겠습니다.
던파 던담분석은 요새 시험준비를 하는 중이라 바빠서 못올리고 있네요...
빠른 시일내에 올리도록 하겠습니다.
감사합니다.
'DB 공부하기' 카테고리의 다른 글
| Mini Project_딥러닝 활용 닮은 연예인 찾기 Django페이지 구현 (0) | 2023.05.22 |
|---|---|
| 230503_DB복습 (0) | 2023.05.03 |
| 230427_DB복습 (0) | 2023.04.27 |
| 230426_DB복습 (0) | 2023.04.26 |
| 230424_DB복습 (0) | 2023.04.24 |


